Formation of Offensive – Tactical Principles
As previously mentioned in another section of this site, hockey tactics, systems and strategies are based on two fundamental concepts; score and do not be scored against. With today’s fast paced game being showcased within the NHL, over the next few years roles of players will evolve into 5 man tactical strategies with offensive roles being identified as F1, F2, F3, F4 and F5 with defensive roles being identified as D1, D2, D3, D4 and D5.
This evolution will bring more excitement to the game and with more demands on winning and the entertainment experience, players development both seasonal and post seasonal will change as well. One of the worrisome trends of course is the focus on defensive strategies leaving a gaping hole in offensive structure. I will always remember a hockey symposium where Fred Shero the coach of the infamous “Broad Street Bullies” or Philadelphia Flyers Stanley Cup Champions in 1973-74. 1974-75 talked about a book that he had written on systems and the reason why he had used them during his coaching experience; “the team needed complete structure due to the fact that over all the players had limited creativity”.
As it has been said, it is hard to defend creativity…ask the players and coaches that tried to shut down Gretzky over the years he played in the league not to mention Mario Lemieux, Mike Bossy, Bobby Orr, etc.
Without getting into how creativity is developed and what exactly is it, I broke each type of tactic whether creative or systems based into the following 9 principles:
Offense – Puck Carrier
- Shoot the puck
- Drive to the net
- Pass the puck
- Protect the puck
- Put puck to safe area
Offense – Puck Support
- Go to the net
- Get open
- Help puck carrier get open
- Retrieve puck
As we can see with these concepts, positional identification becomes irrelevant with only the game principles being important. These 9 principles are in essence the foundation for all skill development. Take Puck Carrier point #1 – Shoot the puck. How many different shooting skills, game situations, shot locations, scoring strategies are there?
If we build on this offensive model and add the offensive scoring strategies an over all tactical scoring model will emerge.
The following tactics represent the true scoring strategies inherent in the game:
- Break-a-way
- Net drive
- Shot
- One-timer
- Screen
- Deflection
- Tap-in
- Net Scramble
- Wrap-a-round
- Walk Out
- Miss fortune (garbage goal)
- Rebound
- **Seldom used but the face off goal (shot off of the dropped puck)
Let’s break this down further:
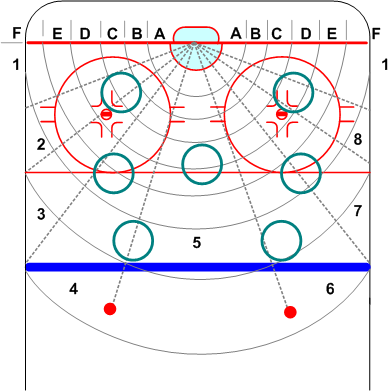
1. Break-a-way: most traditionalists think of the break-a-way as being from the center line in but in fact a break-a-way is a clear unblocked attack lane to the net. Of this there are basically 7 game situations where this happens:
2. Net drive – In this situation, there are 6 basic net drive situations that occur:
3. Shot – As one can imagine, there are countless number of shot locations that exist on the ice surface so for this example, I would like to identify the 6 primary “shooting lanes” that exist on the ice. The following diagram represents angular attacks; Diagonal, horizontal and vertical. These attack lanes can either be proximal or distal from the net and represent the fundamental movement patterns of the goaltender.
4. The One-Timer – There are 7 basic One-Timer locations within the offensive zone. These can be the result of either a power play, 2-1, 3-2, etc. Again, not to say that there are not more but the highest percentage take place in these areas:
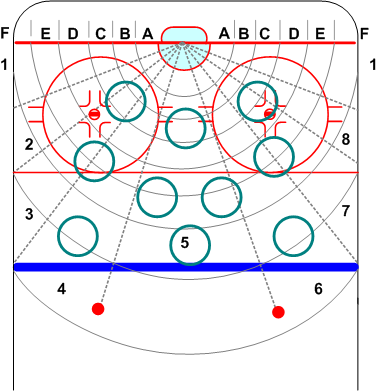
5. Screen Shots – Screen shot locations are numerous but again most take place with in the following 10 primary areas:
6. Deflections -Most people confuse deflections with screen shots and in fact come from 5 primary areas. Deflections can include knock downs, tip ins, redirections, etc.
7. Tap-In. I thing that this opportunity is fairly straight forward and comes from either a power play; back door, or off the rush and is to either side of the net as well as the center slot (tap through five hole) allowing for three (3) options.
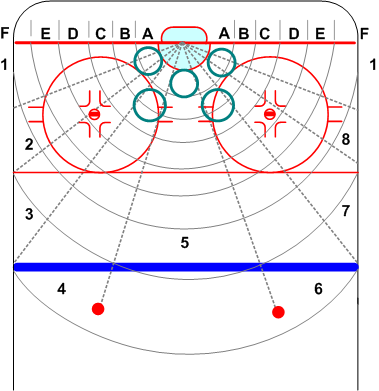
8. The Net scramble is without question one of the most utilized offensive tactics so it goes without saying that these opportunities are created around the crease.
9. The Wrap-around – In essence there are only two basic maneuvers; Goaltender’s glove side and opposite blocker side.
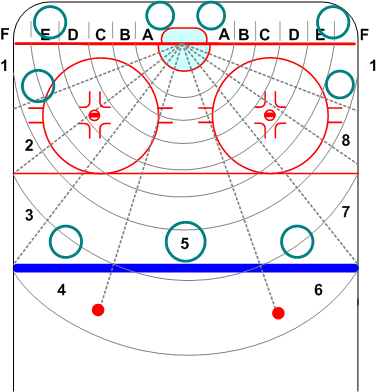
10. The Walk Out Goal – Originates below the goal line. Player basically walks out over the goal line on either forehand or backhand side. As in the Wrap-around goal, there are two option close to the net and two corner drives as shown in the diagram below:
11. Garbage goals – This is every goaltender and team’s night mare. How does one protect against circumstance. However, this fact does introduce itself as a goal scoring strategy and on average occurs in the following 9 locations:
12. Rebound Goals – A common strategy where shots on net are meant to provide scoring opportunities based on a goaltenders inability to control rebounds off of either their lower or upper body. While shots can literally come from anywhere, the most common areas for rebound are as follows:
When we add up the number of basic scoring tactics, locations, etc based on the 10 principles of offense (not including the rebound) we account approximately 55 game situations (counting the net scramble as 1) that could generate offense. It seems unthinkable when looking at this number that a player cannot manage to get at least one goal in every game he plays.
Offensive decisions for the Puck Carrier
In this next section I would like to break down the 5 principles of puck possession.
1. Shooting – can be broken down into the following fundamental concepts of generating goal production:
- Accuracy
- Velocity
- Deception
- Screen
- Motion – (get GT moving)
- Rebound
2. Puck to Net – There are only two primary concepts here
- Puck carrier drives to defender’s active stick side
- Puck carrier drives to defender’s active body side
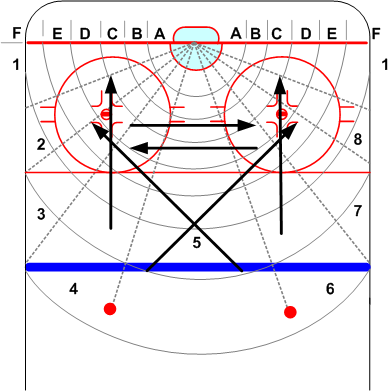
3. Pass the puck – Visually there are only the following options and as such a player must be able to monitor these areas of the ice for support:
- Frontal (North)- forehand and backhand sides
- Diagonal (North East and North West) – Forehand and backhand sides
- Lateral (East and West) – forehand and backhand sides
- Diagonal Backside (South East and South West) – forehand and backhand sides
- Backside (South) – Forehand or backhand
4. Protect the Puck – There are only a couple of options here:
- In the feet
- Forehand side
- Backhand side
5. Safe area – This could include putting the puck on net but generally coaches consider this to be the following:
- On net
- Behind the net
- In the corner
When we consider all of the offensive options we must consider of the course the defensive strategies that try to counter. The offensive zone has many different quadrants depending on the type of offensive tactic used and in this section I will endeavor to put this into perspective relative to the 5 offensive and 4 supportive options.
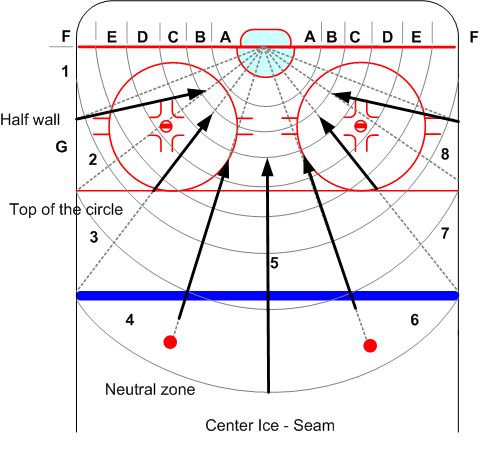
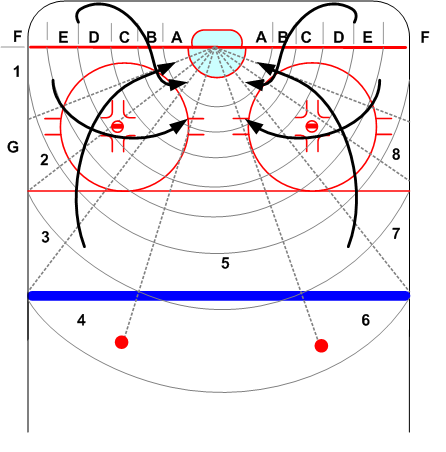
1. The first consideration is the lanes of overlap. Inside defensive structure are territorial responsibilities relative to 6, 5, and 4 man formations. In the 5 man defensive system we have come to know them (thanks again to Fred Shero :-) ) as various numerical systems such as the 2-1-2. In the following diagram I have shown what is called the lanes of “overlap” or to put it simply, where players roles territorially overlap. It is in these areas that the most confusion occurs since each defensive player is actually pulled away from their obvious responsibilities into another player turf so to speak. Each of these overlap zones become key offensive areas for exploiting this confusion whether in possession of the puck or in the role of support.
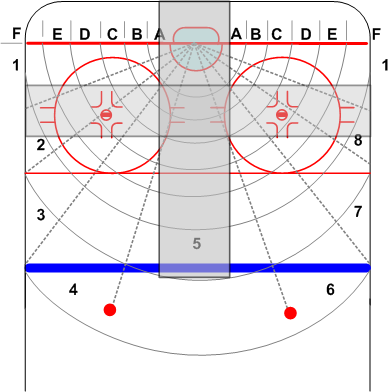 Wayne Gretzky exploited the area behind the net where defensive responsibility specific to each defenseman became confusing; who left the front of the net? He did this so often that it became know as “Gretzky’s office”. Each of these zones are exploited through different tactics such as cycling and power play options.
Off the course the primary objective of defensive exploitation is to generate a shot on net.
In the page “Behind Enemy Lines” I will build out the goal tender counters to match the above mentioned concepts and tactics. I will be adding to this page as well since this is in essence the first draft.
More to come…..Keep posted! Ron

 Subscribe to our RSS Feed